Structure & Architecture
TypeScript
All projects inside this repository use TypeScript as programming language.
Project Structure
This repository contains four projects.
Due to pnpm's workspace feature all dependencies are installed by running pnpm install in the root folder.
The root folder also contains configuration files for ESLint and Prettier aswell as the Dockerfile used to generate the docker image.
The pnpm-workspace.yaml file is empty but it must be present.
Otherwise, pnpm would not treat the repository as a project containing workspaces.
client/
Contains a snowpack project for the React frontend. It comes preconfigured with Hot Module Reload and a special development server to serve the client during development.
While HMR keeps as much state as possible there are some edge cases where React contexts are not reinitialized correctly. In such cases just refresh the page completely.
You also find the snowpack.config.js file at the root of this folder.
In this file you can configure snowpack to your needs.
However, there is a configuration present that works with inter project setup.
One configuration option you might want to change is the URL to an instance of the TMS server you want to use during development.
By default, the configuration assumes that you run a development server locally.
To change the TMS server used change the target property of the apiProxy object:
const apiProxy = httpProxy.createServer({
  // Change this to the URL you want to use.
  target: 'http://localhost:8080',

  /* Rest of configuration */
});
Inside the client project src/ folder you can find the following structure:
-
components/: Contains all components which are used by other components or "pages" (see below). If you add a component a good practice would be to put each component in a subfolder. This makes it easier to split it up into sub-components itself.infoIf you design a component that should only be used by one single page put it next to that page (see below).
-
hooks/: Contains all hooks that can be used by any component in the app. It only containsuseContexthooks if the context is applied to the root level of the application. You can also find helper function which are responsible for fetching data from the backend using Axios.Transform responsesTransformation is not done automatically. If you create a new function for fetching make you need to transform the results before returning them.
-
model/: Contains classes used to transform the responses from the backend to usable objects. These classes are all set up to be used with class-transformer. -
pages/: Contains all components used by the routing logic. These components each represent a "page" of the application and therefore called "pages" in this documentation. Each component has its own subfolder and can depend on special components. If a component is designed to only be used by one page it should be put in acomponents/subfolder of the "page". -
routes/: Contains all the logic needed for the routing logic. All routes used by the application can be found inRouting.routes.ts. If you need more routes add them there. Routes in this application are fully typed (including possible parameters). To achieve this a helper functionpart(..)must be used to create thepathproperty of a route. This function takes in spread list of route parts. If a part is a static one (ie the word "student") you pass it as a string. If a part represents a parameter in the route (ie ":studentId") you must wrap it with a call of theparam(..)function.param(..)takes two arguments:- The first is the string used in the route (without the ":")
- The second is a boolean which indicates if a parameter is optional. If you omit this argument the parameter is considered non-optional.
ExampleIf you want to represent the route
tutorial/:tutorialId/enterpoints/:sheetId, where:sheetIdis an optional parameter, you would create thepathproperty as follows:path: parts('tutorial', param('tutorialId'), 'enterpoints', param('sheetId', true)); -
test/: Basically empty (except an automatically generated test). If the client gets actual tests in the future those should be added here. Please note that the project itself is set up to work with the jest framework. -
typings/: Contains TypeScript typings for modules which do not come with them. Those typings are not complete and mostly only parts which are actually used in the project are typed. Type guards can also be found here. -
util/: Contains all sorts of utility functions and classes. For example, the application wide Logger is found here aswell as the password generator used by theUserForm. Furthermore, the file determining the application's style is in here aswell.
server/
Contains the project for the TMS backend.
It uses NestJS as framework.
Inside the server/ folder you find the following subfolders:
-
app/: Contains a mock html-file so the server would not throw an error if one access a non-api route during development directly. Please note that while the production build also contains anapp/folder this folder is not related to the files used in production. -
config/: Contains several configuration files and pug templates used by the server. The server will use the file that matches theNODE_ENVvariable on start up (ifNODE_ENVis not set thedevelopmentconfiguration will be used). The sample configurations attached to the releases on GitHub only contains the templates and the production configuration. -
src/: Contains the source code (excluding tests) for the server. The source folder has several subfolders itself. The folders have names with speak for themselves:auth/: Code related to authentication.database/: Contains the data models for the database and the code to connect to a database.exception/: Custom, TMS specific exceptions.filter/: Custom filters.Client AppThe
NotFoundExceptionFilteris used to serve the client application properly. Special handling is needed because the client is a single page application.guards/: Guards used to protect the REST API endpoints.middleware/: Custom middleware for the TMS server.module/: Contains all modules of the server. The modules are organized into subfolders.Creating a new moduleTo generate a new module run the following command (replace
<name>with the actual module name). The NestJS CLI will create all necessary files and adds the module to theapp.module.jsfile.nest g module module/<name>pipes/: Custom pipes for the TMS server.shared/: Contains enums and interfaces used by the server and client to make sure that requests and responses are properly typed.cautionDon't put actual classes in here because the work has shown that the server implements the interfaces in a different manner with different needs than the client.
-
test/: Contains files with mocked data and helper functions used solely in tests. Please note that the actual tests are suited next to the corresponding services files.cautionDo not place production code here. It will break the production build.
-
typings/: Contains TypeScript.d.tstype definition files for modules used and which had no types available. Please note that only required typings are defined so these type definitions are not complete.
docs/
Contains the documentation powered by docusaurus.
To add, update (or delete) pages in the documentation add / update the corresponding markdown file into the docs/ folder.
The src/ folder contains the styling (css/), the root React page (pages/) and components that can be used inside the Markdown documents (components/).
Yes, the complete path to markdown files related to the repository's root is docs/docs/<folder>/<filename>.md, don't ask...
scripts/
Contains special scripts to help with more complex tasks.
You can run them with ts-node <script> and some take in additional arguments.
The following scripts are included:
-
build.ts: Builds both the client and the server. Afterwards the client build is copied into the corresponding folder inside the server build so the server can serve the client-side application. -
generate-data/generateData.ts: This script can be used to create a large set of dummy data on the server. You can use a different server than your locally running development server by changing the returned value of thecreateBaseURL()function insideutil/login.ts.cautionDue to the large amount of request required to generate this data set some external servers might block request assuming this is a DDoS attack. The script already contains waiting times to prevent this issue. If those times are too small you can change the corresponding constants at the top of the
generate-data/generateData.tsfile.
Architecture
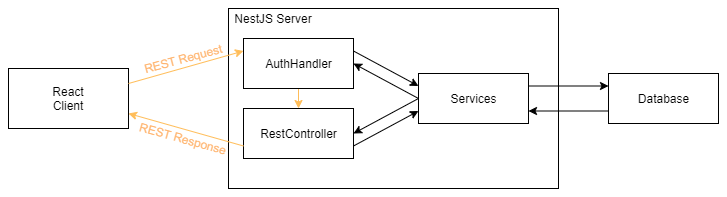
The diagram above shows the basic architecture of the Tutor-Management-System. The orange colored arrows describe the basic flow of a request through the system whereas black colored arrows are interaction between components.
The TMS uses a basic 3-layer architecture: A client layer, a server layer and a data layer. The data layer is one MongoDB which stores all data necessary. This database must be provided externally and is not part of the docker images which get released. The server layer consists of a NestJS server which handles the requests from the client aswell as reading data from and writing data to the database. The client layer is a webapp build with React. Server and client communicate through REST request. Both, server and client, have their own folder each with their corresponding project in it (see above).
Each request follows this basic route: First, it runs through the authentication and one or more authorization guards to ensure the user making the request is allowed to do so. Second, if the request has a body the body gets parsed and converted to an actual object. During this process the body is also validated (if it is invalid an error response is sent and the request handling ends). Afterwards the request gets handed to the appropriate controller which passed it onto the corresponding service. The service communicates with the database to gather and update the necessary resources. Finally, a response is sent to the client. The response could either contain the requested data (or a success message if no data was requested) or it contains an error message if something went wrong.